A wedding RSVP QR code is a small square code that opens your RSVP form when a guest points a phone camera at it. You can make one in about five minutes. You do not need a wedding website first. There are three ways to do it: a dedicated RSVP tool, a plain form plus a free QR generator, or a wedding website builder with RSVP built in. This guide walks through all three and shows the Wedibox route step by step with real screenshots.
Wedibox gives every event a wedding RSVP QR code that opens just the form, at its own address, with nothing else in the way. We have watched couples set this up for more than 100,000 weddings, so the advice below comes from what actually goes wrong at the printer and at the dinner table, not from theory.
What a wedding RSVP QR code does
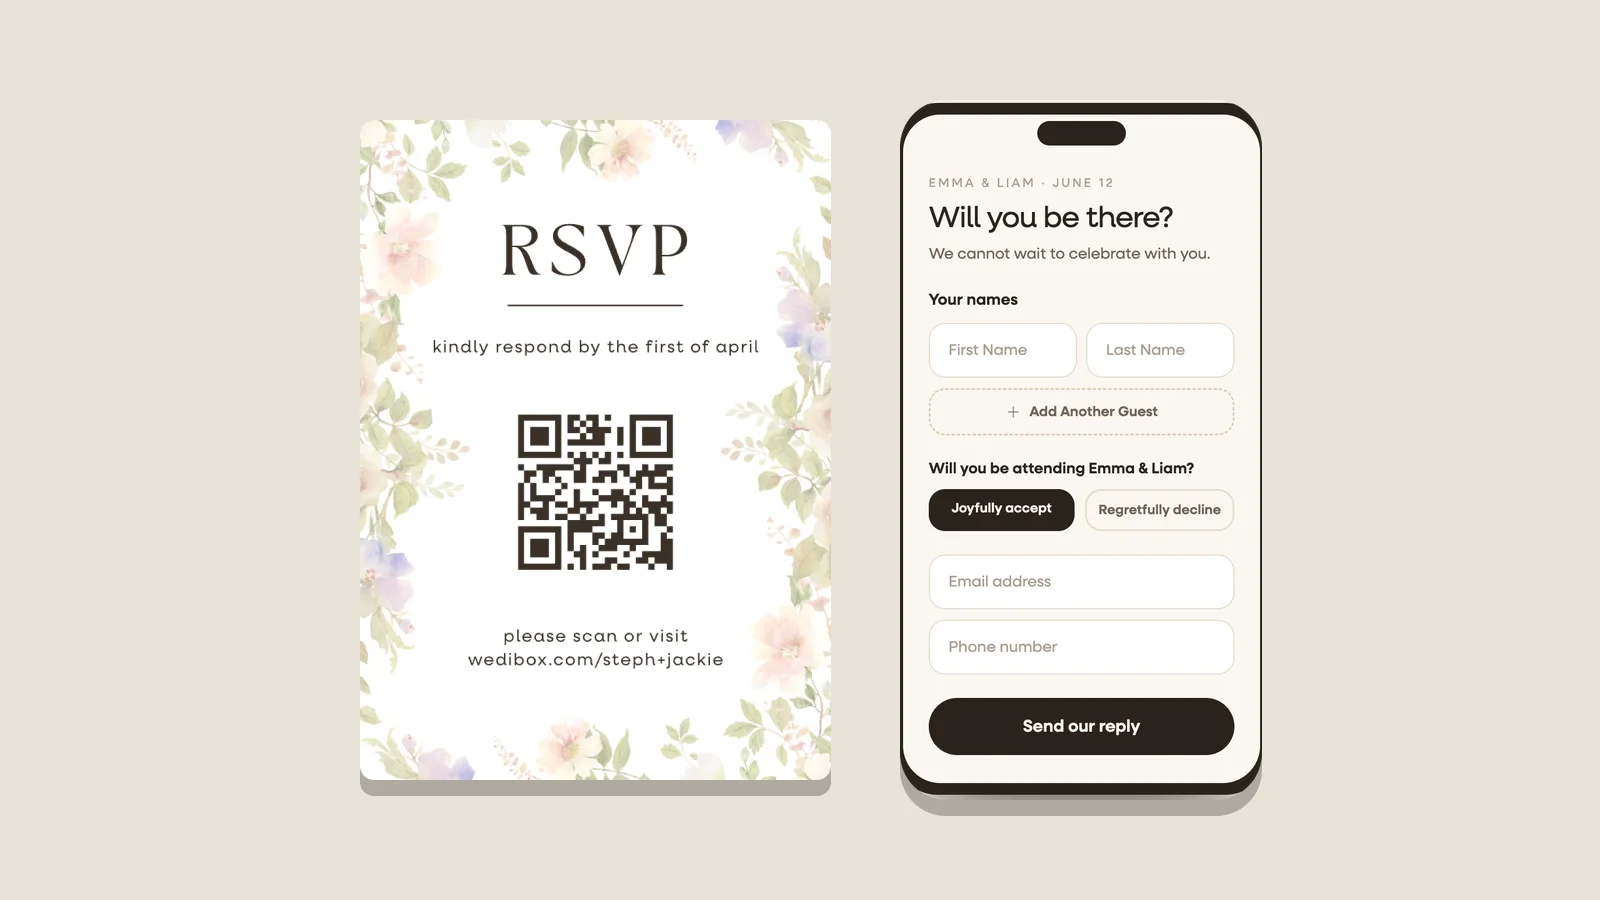
A wedding RSVP QR code links a printed card to an online reply form. The guest scans the code with a phone camera, taps the link that appears, and lands on a short form with your names on it. They type their name, tap yes or no, pick a meal if you ask, and send. You get the reply on a live list within seconds, with the headcount, meals, and plus ones already counted. No reply card, no stamp, no shoebox of envelopes.
The code itself holds nothing but a web address. If the address never changes, the code never changes, and you can print it before the form is finished. Every method below is a way to get a stable address for your form and turn it into a code.
Do you need a wedding website first?
No. A wedding RSVP QR code without a website works fine. All you need is a form with its own link. The code points at the form, the guest fills it in, and no one ever visits a homepage. It is the question we hear most from couples who already sent paper invitations and only want the reply part online.
Here is how the popular tools handle it:
- Wedibox. Every event has an RSVP only code. It opens the form at a dedicated RSVP address. Your wedding page can stay unpublished or unfinished and the form still works.
- The Knot, Zola, and Joy. RSVP is a section of their wedding website. You build and publish a site, then guests reply through it. Their own guides say so: The Knot collects every RSVP through the published website, Zola guests tap RSVP in the site menu, and Joy guests reply from the couple's site. The sites are free, but the site comes first.
- RSVPify and similar RSVP tools. Built around the form, so no site is needed. Paid plans unlock most of the useful features. See how Wedibox compares to RSVPify before you choose.
- Google Forms or Typeform. A form with a link and nothing else. No site, no account for guests, and no wedding features either.
To skip the website entirely, pick a form-first tool. If you already have a site on one of the builders above, use its RSVP and put a QR code for your wedding website on the invitation instead.
Three ways to create an RSVP QR code
All three routes end with the same thing: a code on paper that opens a form on a phone. They differ in what the form can do and what you get back.
| Route | Cost | Setup time | What guests see | What you get back | Needs a website? |
|---|---|---|---|---|---|
| Dedicated RSVP tool (Wedibox) | Free to build. Guest replies unlock with All-In-One, $79 one time. | 5 minutes | A form with your names, attendance, meals, and party members | Live headcount, meal counts, plus ones, caterer export, seating chart link | No |
| Form builder plus a free QR generator | $0 | 10 to 15 minutes | A generic form with your questions | A spreadsheet of answers you count yourself | No |
| Wedding website builder with RSVP | Free on most builders | 1 to 2 hours, because you build the site first | Your website, then an RSVP page inside it | A guest list inside the builder | Yes |
The first route fits when you want the replies to do work for you: meal counts, a chase list, and a seating chart that fills itself. The second is right for a small wedding where you just need a yes or no. The third only makes sense if you were building a website anyway.
How to create a QR code for wedding RSVP with Wedibox
Six steps. Building the form is free on every plan. Guests can open and submit the form once your event is on the All-In-One plan, which is $79 one time and includes the website, photo sharing, and everything else.
- Create a free event and open the RSVP page.
- Build the form. Attendance is already on it.
- Choose what to collect: contact details, party members, meals, and events.
- Switch your one code to RSVP only.
- Download the code and print it.
- Test the code, then watch the replies land.
Step 1. Create a free event and open the RSVP page
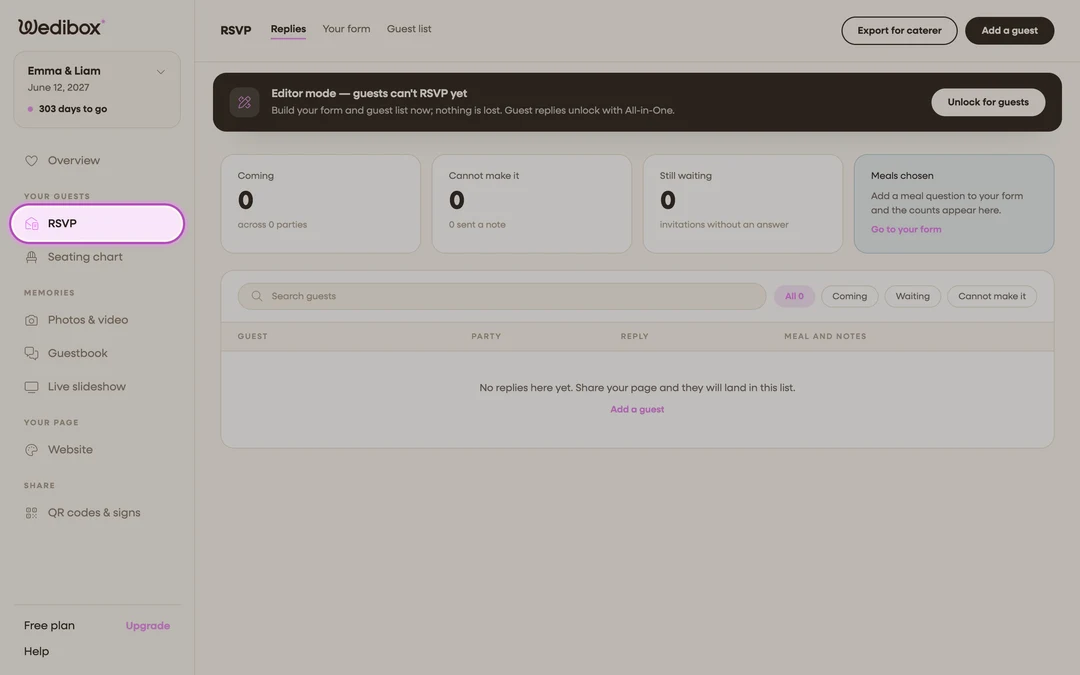
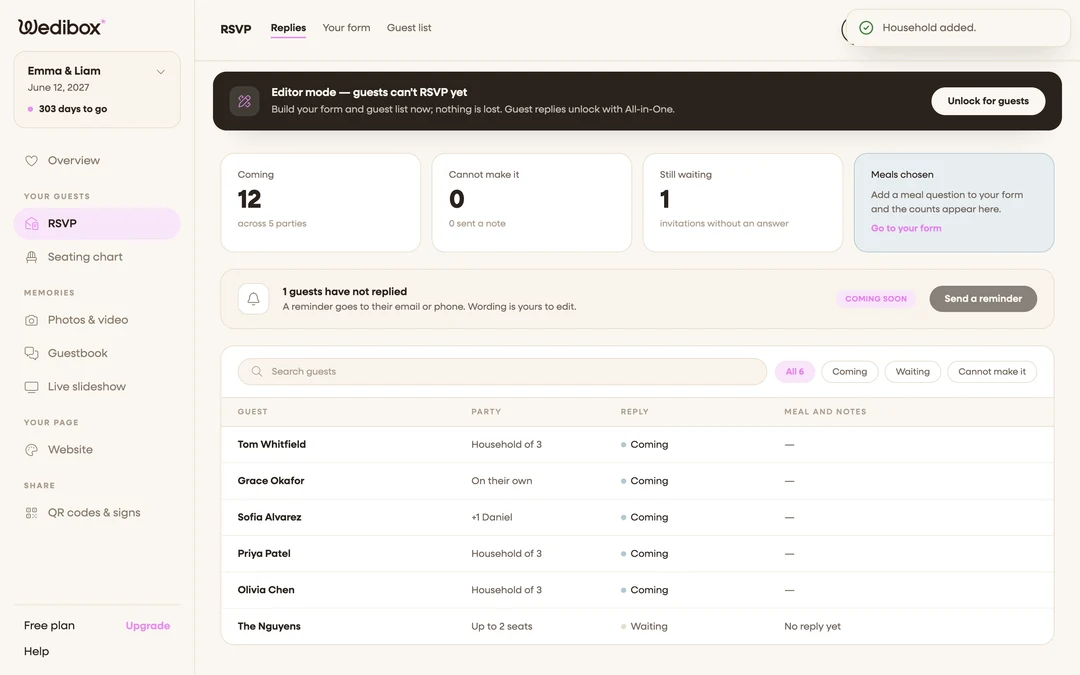
Sign up, enter your names and date, and you land in your event. In the left sidebar under Your guests, click RSVP. The first tab is Replies, and it is empty for now. A dark banner reads Editor mode. That banner is the plan notice: you can build everything here on the free plan, and replies unlock when you upgrade. The full setup is also in the help guide on setting up online RSVP.
Step 2. Build the form
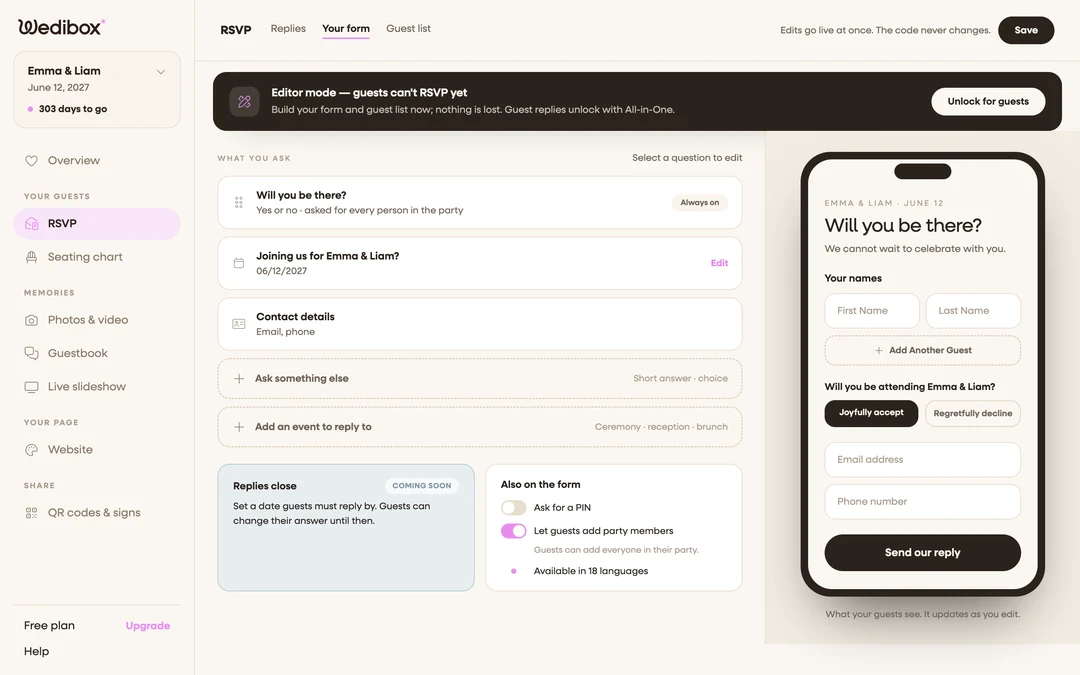
Click the Your form tab. The left side lists what the form asks. The right side is a live phone preview of what a guest will see, and it updates as you edit. The first question, Will you be there, is always on and asked for every person in a party. You never have to build the yes or no part. The header says it plainly: edits go live at once, and the code never changes.
Step 3. Choose what to collect
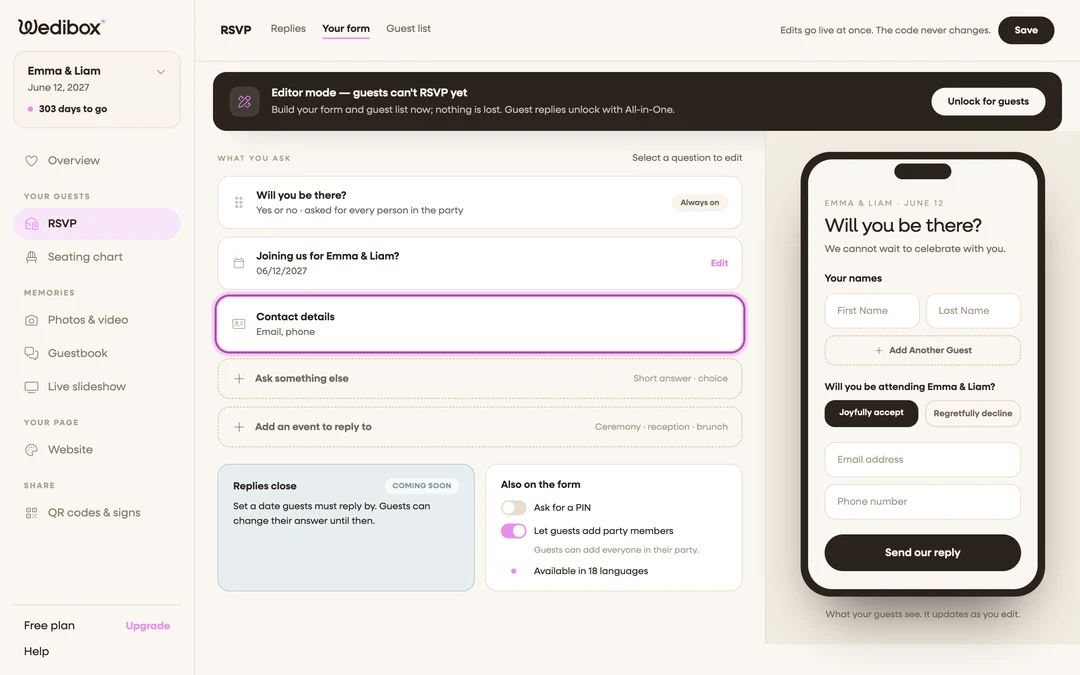
Open the Contact details card and turn on email and phone if you want to write back. Under Also on the form, the toggle Let guests add party members controls plus ones. Leave it on for the classic and guest invitation. Turn it off if each guest should reply only for themselves. Two buttons at the bottom of the list add the rest: Ask something else for a meal choice or a song request, and Add an event to reply to for a ceremony, reception, or brunch split.
Step 4. Switch your one code to RSVP only
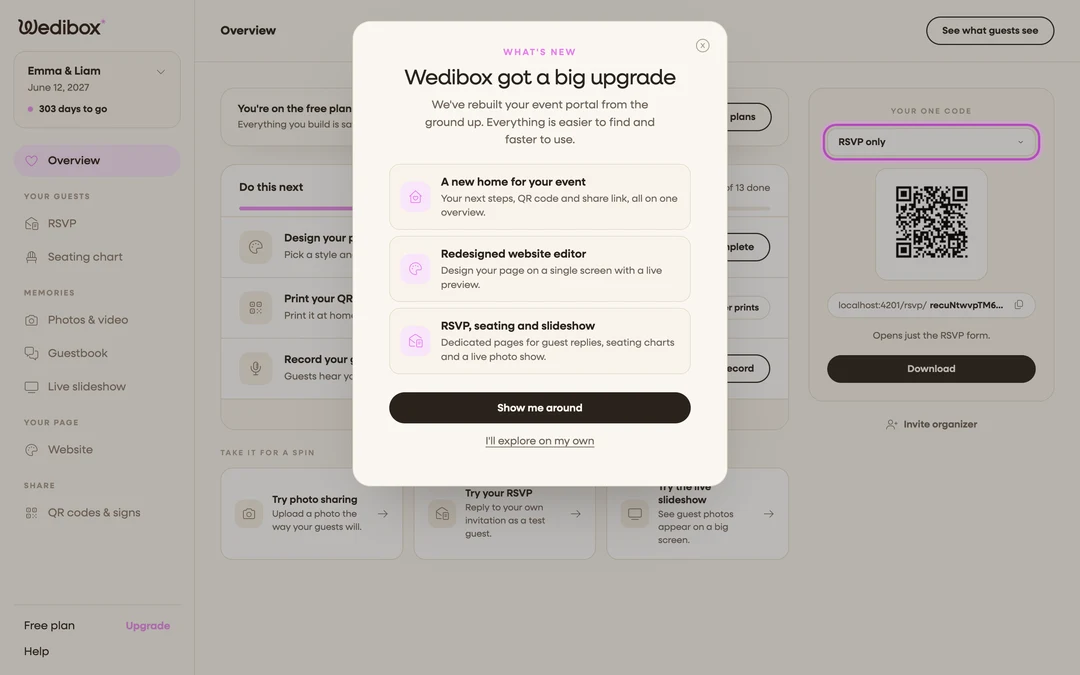
Click Overview in the sidebar. The card on the right, Your one code, holds your QR code and a dropdown above it. The default, Full wedding page, opens everything you have turned on. Change it to RSVP only. The code and the address under it switch to a dedicated RSVP page that opens just the form. This is the code that goes on paper that arrives before the wedding. The guide to the three QR codes explains when to use each flavor.
Step 5. Download the code and print it
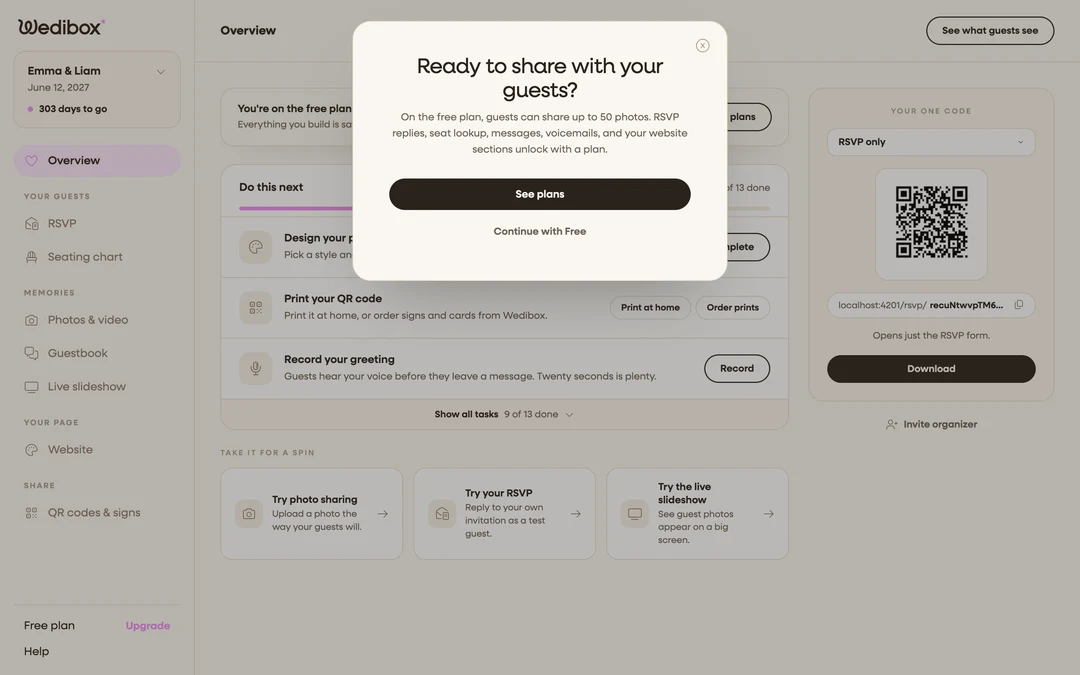
Click Download under the code. On the free plan this is where the plan prompt appears, because the RSVP only code is part of All-In-One. Once your event is on that plan, the download popup lets you set the code color and background, or make the background transparent, and saves an image for your invitation suite. The address next to the code is the same link, ready to paste into a digital invitation or a group chat. The steps are in the help guide on sharing your RSVP link and QR code.
Step 6. Test the code, then watch the replies land
Scan the downloaded image with your own phone before you send anything to a printer. It should open the form directly, with your names at the top. Submit a test reply. It shows up on the Replies tab within seconds, and you can delete it from its detail view. From then on the Replies tab is your headcount: Coming, Cannot make it, Still waiting, and Meals chosen, with a search box and status filters. The guide to tracking who is coming covers the filters and the caterer export.
That is the whole job. If you would rather see the full feature list first, the wedding RSVP QR code page shows meal choices, plus ones, sub events, and the seating chart link in detail.
How to make one with a form and a free QR generator
This is the free route, and it is a fair choice for a small wedding. It takes a form builder and a QR generator. Here is how to make a QR code for RSVP this way in four steps:
- Build the form. Open Google Forms, Microsoft Forms, or Typeform. Add a name field, a yes or no question, a party size field, and a meal choice if you need one. Keep it short.
- Get the link. Click Send or Share and copy the form link. Google's guide to publishing and sharing a form shows where it is. Test the link in a private browser window to make sure it opens without a login.
- Turn the link into a code. Paste it into the free wedding QR code generator. Match your colors, add a monogram if you like, and download PNG for home printing or SVG for a print shop. There is no watermark, no signup, and the code never expires.
- Scan and print. Scan the downloaded code with a phone, confirm it opens the form, then add it to your RSVP card.
Know what you give up. A generic form has no idea who your guests are. It cannot look up a household and show the names you invited, so you will get replies for people who were not on the list. It does not tally meals or tell you who has not answered. You count all of that in a spreadsheet, and you build the seating chart by hand afterward. For 40 guests that is an evening. For 150 it is a part time job.
Where to put the code
The RSVP code belongs on paper that arrives before the wedding. In order of how many replies each spot brings in:
- The RSVP card or the back of the invitation. The main spot. Print the code at least 0.8 to 1 inch square with a short line such as Scan to RSVP by June 1, and print the short link under it for anyone who prefers to type.
- The save the date. A code here pulls in your closest family and friends early, and it teaches everyone else that your wedding runs on one scan. What we see in the product is a small early wave of replies from a save the date, then a much bigger wave when the invitation lands. Treat the save the date code as a warm up, not the main event.
- Digital invitations and the group chat. Paste the link, not the code. Nobody scans a code on the phone they are reading it on.
- The wedding website header. If you have a wedding website, add an RSVP button there too. Some guests will go looking for it even after they have the code.
One rule covers all four spots. Only print a code that will still work in a year. A code from a generator that charges a subscription can stop working when the trial ends. The Wedibox codes and the free generator codes never expire, which is why it is safe to print before the menu is final.
What guests see when they scan
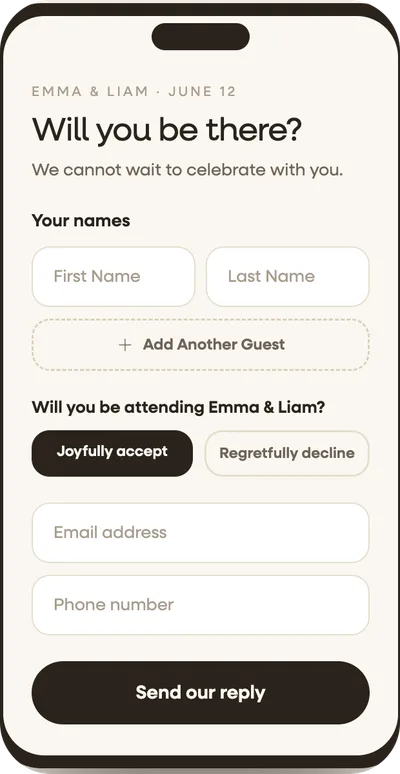
The guest points the phone camera at the code. A small link pops up on screen. They tap it and a page opens in the browser with your names, your date, and one question: Will you be there. They type their name, tap Joyfully accept or Regretfully decline, add a plus one if you allowed it, pick a meal if you asked, and tap Send. No app, no account. It takes under a minute on any recent phone.
Couples worry most about grandparents. In our experience the older guests are not the problem. Almost every phone now reads a QR code straight from the camera app. Apple documents it for iPhone and Google for Pixel phones, and other Android cameras work the same way. A printed code in good light scans on the first try. Where older guests get stuck is a code that is too small to frame, or a link they have to type by hand. Give them a code the size of a postage stamp or larger, print the link under it, and they either scan it or hand the phone to whoever is sitting next to them. Both count as a reply.
Mistakes that cost you replies
- Printing the full page code instead of the RSVP code. This is the mistake we see most. Guests land on the homepage, scroll, and never find the form. Use the RSVP only flavor on anything that arrives by mail.
- A code smaller than 0.8 inches. Older cameras cannot focus on it. Size up before you cut the design.
- Low contrast colors. A pale code on a pale card looks lovely and does not scan. Keep the code darker than the background and test it before the full print run.
- No short link under the code. A few guests will always prefer to type. Give them the address.
- No reply deadline on the card. The code makes replying easy, not urgent. Print the date.
- Skipping the test scan. Scan it from a different phone than the one you built it on, before it goes to the printer.
- Asking too many questions. Every extra field loses a few replies. Names, attendance, plus one, meal. Stop there unless you truly need more.
Once the replies are in, the next job is the seating chart, and a guest list that already lives online makes it a short one. For the reception side of the same one code idea, the companion guide on setting up a QR code for photo sharing covers guest photos.