A tour of your event dashboard
Getting startedAll plans
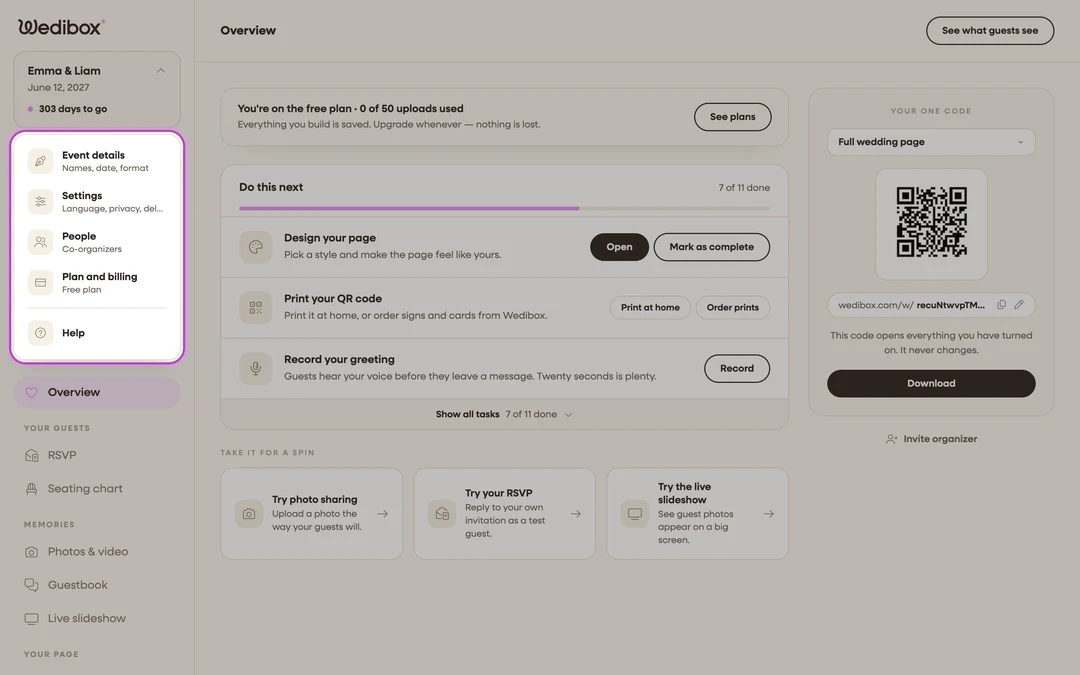
Open any event and you land on its Overview, home base for that wedding. It’s built around three things: one banner showing where your event stands, one checklist showing what to do next, and your QR code, always within reach.

The top of the page
A greeting with your countdown (“Your wedding is 94 days away.”), and a See what guests see button that opens your live page in a new tab, the fastest reality check in the app.
The status banner
One banner shows one honest state at a time. What it says depends on where your event is in its life:
| Banner | What it means |
|---|---|
| “You’re on the free plan · X of 50 uploads used” | Free plan, page live, upload counter running. |
| “Your wedding is in X days” | Free plan, 15 to 60 days out. Upgrading now starts your upload window on the wedding date, not today. |
| “All set. Your year starts on your wedding day” | You activated with a future date; uploads open then. |
| “Your page is live · X photos so far” | Upload window open; guests are contributing. |
| “Guests can upload for X more days” | Upload window closing soon. Extend it or do a last share. |
| “Your storage ends in X days” | Storage closing. Extend or download everything first. |
| “Uploading has ended · your memories are safe” | Uploads closed; browsing and downloads still work. |
| “Your gallery is archived, not gone” | Storage ended; content is intact but paused until you extend. |
The same states appear as chips on your Your events list: Live, Scheduled, Uploads closed, Stored, Archived, Finish setup, Free plan. Free events there also show “X of 50 used” once uploads start and “X days to go” while the wedding is ahead.
Do this next: the checklist
The card shows one hero task: the single next thing worth doing. Click Show all tasks to see everything, grouped by feature (The basics, Photos & video, RSVP, Guestbook, Seating, Registry; groups appear only for features you’ve turned on). Some tasks are one-tap decisions (“Who should see guest uploads?”); the rest jump you to the right screen. The ✓ marks a task done by hand, the ✕ skips it, and Restore undoes either. On the free plan, once every task is done the card changes to “Your page is ready.” with a See plans button and the date your uploads would start.

The right rail: your one code
The Your one code card holds your QR code. A dropdown chooses what the code opens: Full wedding page (the default: everything you’ve turned on), Photo sharing only, Live slideshow, RSVP only, Seating chart only, or Playlist only. Below it: your exact link with copy and edit buttons, Download, and (once setup wraps) Print signs plus sample print designs generated with your names.
Under that sits the access card: invite a co-organizer with Invite someone. It’s free on every plan.
The sidebar
The left sidebar is the same on every screen of your event:
- Overview: this page.
- Your guests: RSVP · Seating chart.
- Memories: Photos & video · Guestbook · Live slideshow.
- Your page: Website (the editor).
- Share: QR codes & signs.
Click your event’s name at the top of the sidebar to open the event menu: Event details (names, date, format), Settings (language, privacy, delete), People (co-organizers), and Plan and billing. On the free plan the sidebar footer shows Free plan with an Upgrade link.
FAQ
Where did a task go after I finished it? Into the expanded list under Show all tasks, marked Done.
Why don’t I see RSVP or Seating tasks? Checklist groups follow the features you’ve enabled. Turn a feature on in the website editor and its tasks appear.
Where do I manage more than one event? The Wedibox logo at the top of the sidebar opens Your events: every event on one list, each with an Open button.